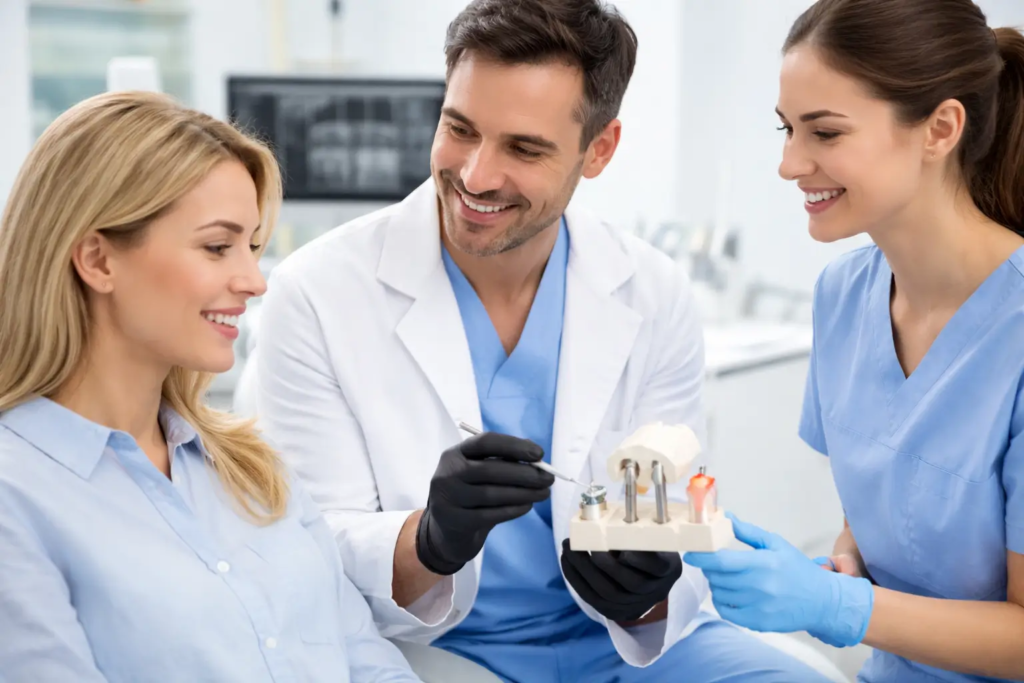
One of the most common things we hear from patients considering dental implants is some version of the same admission: ‘I’ve been putting this off because I don’t really know what’s involved.’
That’s exactly what this article is for. The implant process at D&FD Miami is straightforward, but it has several distinct phases, and knowing what each one involves makes it significantly easier to commit to. No vague timelines, no glossed-over procedures. Here is what actually happens, from your first appointment to your final crown.
The implant process typically involves 3 to 5 appointments over 3 to 8 months, depending on whether bone grafting is needed. Most patients are surprised by how manageable the experience is when they know what to expect.
Overview: how many steps, how much time, and what to expect overall
Before walking through each step, it helps to understand the two main paths the process takes, because the timeline depends heavily on one variable: whether bone grafting and/or a soft tissue management are needed.
The straightforward case: no bone graft needed
For patients with adequate jawbone density and healthy gums, which describes the majority of people replacing a single missing tooth, the implant process follows a compact sequence:
- Evaluation and treatment plan: 1 appointment
- Implant placement surgery: 1 appointment
- Healing phase (osseointegration): 3 to 6 months with no active appointments
- Second stage or implant access (if needed): 1 appointment
- Impression for custom abutment and crown: 1 short appointment
- Crown fitting and delivery: 1 appointment
Total: 4 to 5 appointments over approximately 3 to 6 months. Most patients find this shorter and less involved than they anticipated.
When soft tissue management is needed: what changes
Sometimes, once the implant is solid in the bone, soft tissue conditioning is performed to optimize esthetic and functional results. This procedure usually adds just 1 extra appointment to the process.
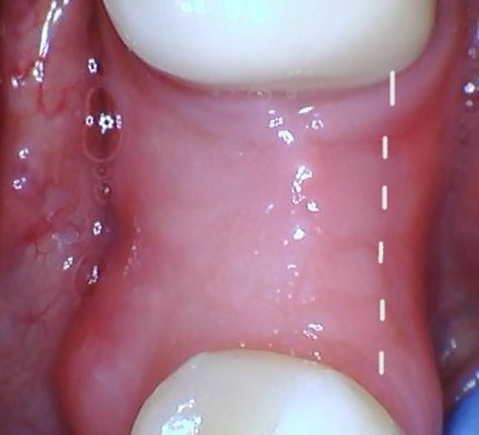
Soft tissue management refers to the active shaping, preserving, or rebuilding of the gum tissue to ensure your final implant looks natural and stays healthy for the long term. While the implant screw bonds to the bone (osseointegration), soft tissue management focuses on the “pink” part of your smile—the gums.
Why Soft Tissue Management is Essential
- Creating a Biological Seal: Well-managed gums form a tight protective barrier around the implant abutment, shielding the underlying bone from bacteria and preventing infections like peri-implantitis.
- Natural Aesthetics: It ensures the replacement tooth has a “natural emergence profile,” meaning it looks like it is growing out of the gums rather than just sitting on top of them.
- Long-Term Stability: Thick, healthy gum tissue (at least 2mm of keratinized tissue) is more resilient to the stresses of daily chewing and brushing, reducing the risk of gum recession or bone loss over time.
How Dentists Manage the Tissue
Depending on your needs, a dentist might use several strategies, a few examples are:
- Tissue Conditioning with Provisionals: Using a temporary crown for several weeks or months to apply gentle pressure, “squeezing” the gums into the desired scalloped shape before the final tooth is made.
- Soft Tissue Grafting: If your gums are too thin or have receded, the dentist may surgically transplant a small piece of tissue (often from the roof of your mouth) to increase gum volume and thickness.
- Apically repositioned flap (APF) is a surgical technique used to increase the zone of keratinized mucosa around the implant. Instead of cutting away gum tissue to expose the implant (which can waste valuable “tough” tissue), the dentist makes an incision and “slides” the existing healthy gum tissue downward (apically) toward the base of the implant.
When bone grafting is needed and cannot be placed along with the implant: what changes
If imaging at your evaluation reveals insufficient bone volume at the implant site that cannot be replaced at the time of implant placement, which is common when a tooth has been missing for more than a year, bone grafting is required before implant placement can proceed. This adds a preparatory phase to the process:
- Evaluation and treatment plan: 1 appointment
- Bone graft procedure: 1 appointment
- Bone graft healing: 3 to 6 months
- Implant placement surgery: 1 appointment
- Osseointegration healing: 3 to 6 months
- Abutment and crown: 1 to 2 appointments
Total timeline with grafting: approximately 8 to 12 months. The additional time reflects biology, not complexity, the bone simply needs time to integrate the graft before the implant can be placed into a stable foundation.
Both paths are described in detail in the steps below. Steps 1, 3, 4, and 5 apply to all patients. Step 2 applies only when preparation is required.
Step 1: Your evaluation and treatment plan
Every implant case at D&FD begins with a comprehensive evaluation. This is not a sales consultation, it’s a clinical appointment with a specific diagnostic purpose. Your evaluation is $250 and includes examination and X-rays.
What we examine and why it matters
During your evaluation, we assess:
- Gum health: active gum disease needs to be treated before implants can be placed. We assess the depth of gum pockets and the overall condition of the periodontal tissue.
- Bone volume and density: While technically not mandated for every single case, a CBCT (Cone Beam Computed Tomography) scan is widely considered the standard of care for assessing dental implant viability and planning the procedure. This scan provides a three-dimensional view of the jaw and the highest level of precision, which is especially important in prosthesis-driven implants.
- Adjacent teeth and bite: the position of the teeth on either side of the gap and your overall bite pattern affect both the planning and the final restoration.
- Medical history and medications: certain systemic conditions and medications affect healing and need to be part of the planning process. We cover this in full, including any implications for the treatment timeline.
By the end of the evaluation, we have everything we need to give you a complete, accurate treatment plan. If additional imaging is recommended, that can typically be done at the same visit or scheduled quickly afterward.
Your treatment plan: clear pricing before anything begins
Before you leave your evaluation appointment, you receive a written treatment plan that itemizes every procedure involved and its associated cost. This includes:
- The implant post, abutment, and crown
- Any preparatory procedures and appliance needed (bone graft, extraction, socket preservation, surgical guide)
- PRF, if it is clinically indicated for your case
- The number of appointments and the estimated timeline
Nothing is vague. The price you see is what you’ll pay. If your clinical picture changes during treatment, for example, if a finding during surgery requires a modification to the plan, we tell you immediately, give you the updated cost, and proceed only with your confirmation.
You are under no obligation to proceed with anything at this appointment. The evaluation gives you the information you need to make a confident decision in your own time.
Step 2: Preparing the site (bone graft or extraction, if needed)
This step applies only to patients who require site preparation before implant placement. If your evaluation confirms adequate bone and gum health, you move directly to Step 3.
What bone grafting involves and what recovery looks like
A bone graft procedure is performed under local anesthesia and typically takes 30 to 60 minutes. The procedure involves placing graft material, which may be synthetic, from a tissue bank, or in some cases derived from another area of your own jaw, at the site where the implant will be placed. The graft is covered with a membrane and the gum tissue is sutured closed over it.
The recovery from a bone graft is similar to the recovery from a tooth extraction: some swelling and soreness in the first 48 to 72 hours, manageable with over-the-counter pain medication in most cases, and a soft food diet for approximately one to two weeks. Most patients return to normal activity the following day.
After the graft procedure, you return for periodic check-up appointments to monitor integration. At approximately three to six months, a follow-up X-ray or CBCT confirms whether the graft has matured sufficiently to proceed with implant placement.
How PRF is used at this stage
For patients undergoing bone grafting at D&FD, PRF (Platelet-Rich Fibrin) is routinely used as an adjunct to the graft procedure. The PRF membrane, prepared from your own blood on the day of the procedure, is mixed with the graft material to create a biologically active matrix that accelerates vascular invasion of the graft and promotes faster, more predictable bone formation, also known as sticky bone.
In cases where a tooth is being extracted in preparation for a future implant, PRF socket preservation is used at the time of extraction to maintain bone volume at the site during the healing period, reducing the need for a larger graft later.
For a full explanation of how PRF works and what the research shows, see our dedicated article on PRF and dental implant healing.
Step 3: Implant placement surgery
Implant placement is the step that generates the most questions, and the most anxiety. The honest description is this: it is a minor surgical procedure, performed under local anesthesia, that most patients find significantly more manageable than they expected.
What happens during the procedure
Here is what the procedure involves, in sequence:
- The treatment area is thoroughly numbed with local anesthetic. Most patients feel the initial injection as a brief sting; after that, the area is numb and you should feel no pain during the procedure.
- A small incision is made in the gum tissue to expose the underlying bone at the implant site.
- A custom-made surgical guide is placed to ensure millimetric precision, resulting in a safer procedure and more predictable results.
- The bone is prepared with a series of precision drills, increasing incrementally in diameter to create the exact dimensions required for the implant post. This is done slowly and with irrigation to prevent heat build-up. You will feel pressure during this stage, but not pain.
- The titanium implant post is carefully threaded into the prepared site and tightened to the appropriate torque, establishing initial stability (primary stability) with the surrounding bone. As a second layer of confirmation, primary stability and bone-to-implant contact are assessed using ISQ technology (such as Osstell or Penguin). This helps establish a baseline for monitoring the implant’s osseointegration over time, complemented by traditional X-ray imaging.
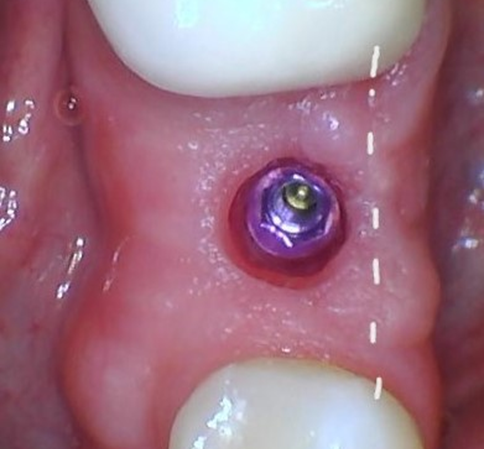
- A healing cap or cover screw is placed on top of the implant post, and the gum tissue is sutured closed around it.
For a single-tooth implant, the procedure typically takes 45 to 90 minutes. For multiple implants, the time extends proportionally. You are awake throughout and able to communicate with the dentist.
The most common patient feedback after implant surgery: ‘That was easier than I thought it would be.’ Local anesthesia is effective, and the sensation during placement is pressure, not pain.
Patients next day messages:

Pain, discomfort, and recovery: what the first 72 hours actually look like
Once the local anesthetic wears off, typically 3 to 4 hours after the procedure, you will begin to feel some soreness and tenderness at the surgical site. This is normal and expected. For most patients, discomfort is manageable with over-the-counter pain killers (following standard dosing guidelines) and does not require prescription pain medication.
The timeline might looks like this:
- Hours 0–6: the area is still partially numb; minimal discomfort.
- Hours 6–48: peak soreness and swelling. This is when most patients feel the implant surgery the most. Medication, ice packs applied externally for 10-20 minutes intervals on and off during the first day, and rest are the standard approach.
- Days 3–5: significant improvement in most cases. Swelling begins to resolve. Soreness reduces to mild tenderness.
- Days 5–7: most patients are back to normal function. The sutures dissolve or are removed at a follow-up appointment.
Patients who received PRF as part of their implant placement typically report faster resolution of swelling in the first 48 to 72 hours compared to the standard recovery arc described above.
What to eat, avoid, and watch for after surgery
Following implant placement, the instructions are straightforward:
- Diet: soft foods for the first one to two weeks. Yogurt, eggs, soup, mashed vegetables, fish, and similar textures are fine. Avoid hard, crunchy, or chewy foods that require significant biting force at the surgical site.
- Oral hygiene: brush gently around the implant area; a soft-bristle toothbrush is recommended. Rinse with warm salt water two to three times daily starting 24 hours after the procedure. Do not use water flossers or electric brushes at the surgical site until cleared to do so.
- Smoking: avoid smoking for at least two weeks post-surgery, and ideally longer. Smoking significantly impairs healing and increases the risk of implant failure.
- Physical activity: Normal activity may be resumed after 24 hours in most cases.
Contact us if you notice: heavy bleeding that doesn’t respond to gentle pressure, increasing pain after the first three days rather than decreasing, significant swelling after day four, fever, or any discharge from the surgical site that doesn’t resolve. These are uncommon but worth a call.
Step 4: Osseointegration: the healing phase
After implant placement, the most important phase of the entire process begins, and it is the one that involves the least active treatment. Osseointegration is the biological process by which the titanium implant post fuses with the surrounding jawbone, and it is the foundation on which the entire restoration rests.
Why this phase takes 3 to 6 months, the biology explained
Titanium has the unusual property of being biocompatible, the body does not recognize it as a foreign body and attempt to reject it. Instead, the bone cells gradually grow onto and into the microscopic surface texture of the titanium post, physically bonding the implant to the jaw. This process is called osseointegration.
It cannot be rushed. After your implant is placed, your jawbone goes through a natural healing journey—starting with a protective blood clot, followed by the growth of soft ‘new’ bone, and finally transforming into strong, mature bone that is tough enough to handle the everyday pressure of chewing. This is a biological timeline that is the same for every patient. Attempting to place the final restoration before osseointegration is complete risks placing load-bearing stress on the implant before the bone is ready, which significantly increases the risk of implant failure.
The three-to-six-month range reflects the natural variation between patients: younger patients with denser bone tend toward the shorter end of the range; older patients, patients with systemic conditions that affect bone metabolism, or patients who needed bone grafting tend toward the longer end. Imaging at the follow-up appointment and ISQ measurements confirm when integration is complete.
What to expect and how to protect the implant during healing
During the osseointegration phase, you will have minimal active appointments, typically one or two check-in visits for imaging and assessment. Here is what patients commonly want to know:
- What does osseointegration feel like? In most cases, nothing. You should not feel the implant integrating. Any sensation at the site that increases rather than decreasing after the first week is worth reporting.
- Can I eat normally? After the initial two-week recovery period, you can return to a normal diet, with one caveat: avoid placing hard biting forces directly on the implant site until the crown is placed. The healing cap on top of the implant post is not designed to bear load.
- Do I need to do anything special? Continue normal oral hygiene. Keep the healing cap clean. Attend your scheduled check-in appointments.
- Can anything go wrong during this phase? Implant failure during osseointegration is uncommon but possible. The most common causes are smoking, systemic factors that weren’t adequately controlled, loading the implant too early, or infection at the site. Following post-operative and healing instructions minimizes all of these risks.
Step 5: Abutment placement and crown fitting
Once osseointegration is confirmed, the restoration phase begins. After months of preparation and healing, this is the part of the process patients look forward to most, if no tissue conditioning procedure is needed, you’re finally getting the tooth.
The impression appointment: quick and straightforward
The impression appointment is one of the shorter and simpler appointments in the entire process. Usually no anesthesia is needed, the healing cap is removed, and a scan body is temporarily screwed into the implant, acting as a digital marker that tells our 3D scanner exactly where the implant is located, its depth, and its angle. This allows us to design your final tooth with perfect precision without the need for messy, traditional impressions.
Then a digital scan of the area is taken and then sent to the dental laboratory that fabricates your custom abutment and crown, this typically takes less than a week.
Your final crown: what it looks, feels, and functions like
Your permanent crown is fabricated from high-quality ceramic to match the color, shape, and translucency of the surrounding natural teeth. At the crown delivery appointment, the crown is attached to the abutment with cement, and your bite is carefully checked and adjusted until it feels completely natural.
Most patients notice the crown feeling slightly different from their natural teeth for the first one to two weeks, not uncomfortable, just noticeable. Within a few weeks, the brain adapts and the implant becomes part of the normal dental landscape. Patients consistently report that within a month, they no longer think about the implant at all.
The crown should be cared for exactly like a natural tooth: brush, floss (using implant floss or a floss threader to clean under the crown margin), and attend regular professional check-ups. The implant post beneath it is designed to last a lifetime with proper care; the ceramic crown above it can be expected to last 15 to 20 years before replacement may be needed.
The first bite with your new crown, on food you’ve been avoiding since you lost the tooth, is a moment most patients genuinely look forward to. It’s the payoff for everything that came before it.
Ready to start? Here’s your first step
You now have a complete picture of the implant process: what each appointment involves, how long each phase takes, what the recovery looks like, and what the end result feels like. The only thing the process cannot tell you until a clinician examines you is which path applies to your specific situation, whether you need bone grafting, what your timeline will realistically be, and what the total cost will come to.
That is exactly what the $250 evaluation at D&FD is for. Our doctors will examine you, review your imaging, and give you a complete treatment plan with transparent pricing before you commit to anything. You move forward only when you’re ready.
Book at Gables Dental Care (3815 SW 8th Street, Coral Gables) or EliteDent (12538 SW 120th Street, Kendall). Call ahead to verify insurance coverage. Both locations are available Monday through Friday, with alternate Saturdays at Coral Gables.
The process we’ve described in this article is the same one every D&FD implant patient goes through. No surprises, no hidden steps, no pressure at any point along the way. Your first step is the $250 evaluation. Everything else follows from there.